For the development of a business application, which meets the needs of a human-centric workflow, it is a good choice to use the Imixs-Workflow Engine to separate the business and workflow logic. On the other hand the separation of services is one of the core concepts of a modern microservice architecture. With the new Imixs-Microservice project, Imixs-Workflow provides a Docker image, which is containing the Imixs-Workflow Engine running in a WildFly Java EE server. This Docker image can act as a black box for any modern business application. In this architecture, the Imixs-Workflow is responding to RESTful API calls from any core business application.
The Docker Image
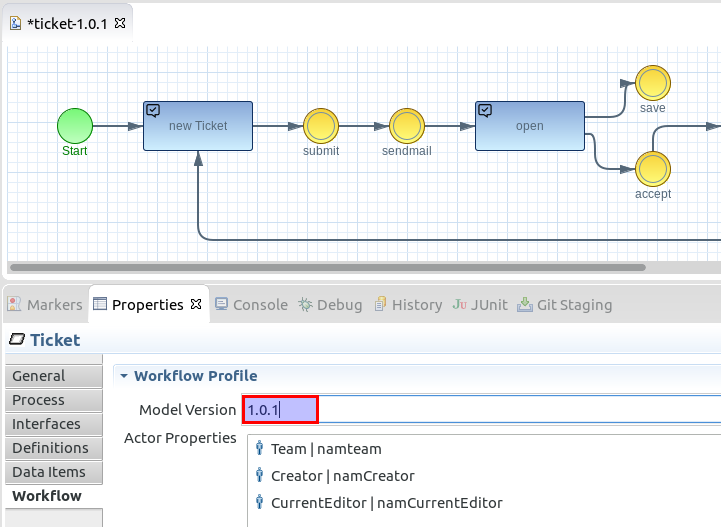
The Docker image, provided by the Imixs-Microservice project, can be used out of the box for testing purpose or as a template for a custom docker image to be used in a productive environment. Once the container is started from this image, a custom business process model can be developed and deployed into the workflow engine via the Rest Service API. The project provides a example workflow. This BPMN 2.0 model was designed with the Imixs-BPMN Modeller:

This workflow is a simple example how to track tickets by a support team in a call-centre or a customer-support. After a new ticket was created it is assigned to a support team. Each member of a support team can accept the ticket for further processing. The ticket can be reassigned to the team or closed by solving the ticket.
The following JSON request object shows how a new process instance for the ticket workflow looks like when using the RESTful API :
{"item":[
     {"name":"$modelversion","value":{"@type":"xs:string","$":"my-model-definition-0.0.2"}},
     {"name":"$processid","value":{"@type":"xs:int","$":"2000"}},
     {"name":"$activityid","value":{"@type":"xs:int","$":"1"}},
     {"name":"namteam","value":[
                {"@type":"xs:string","$":"admin"},
                {"@type":"xs:string","$":"eddy"},
                {"@type":"xs:string","$":"anna"}
                   ]},
     {"name":"_subject","value":{"@type":"xs:string","$":"Some usefull data.."}}
   ]}
After this JSON object was send to the Rest Service by a POST request, the Imixs-Workflow engine creates a new process instance assigned to the task ‘New Ticket’ and triggers the Event ‘Submit’ to assign the ticket to the support team. The process instance is stored into a Postgres Database.
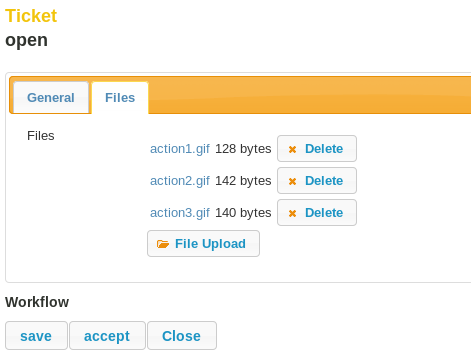
Each member of the team can now request a task list with all open tickets assigned to himself.
curl --user admin:adminadmin http://localhost:8080/imixs-microservice/workflow/worklist
Each workitem included in the result provides a set of attributes managed by the Imixs-Workflow engine. This information can be used to track the status of each ticket.
Using the Imixs-BPMN modelling tool each event can be modelled with a custom behaviour. For example using the Imixs Mail Plug-In a e-mail notification can be send automatically to the support team after a new ticket arrived. Imixs-Workflow provides a set of plug-ins to fit the needs of typical human-centric business tasks.
Access Control and User Management
One of the core features of a human-centric-workflow engine is the routing and user management of process instances. Each process instance running in the Imixs-Workflow engine is assigned to a dedicated list of owners and a read- and write-access-list.
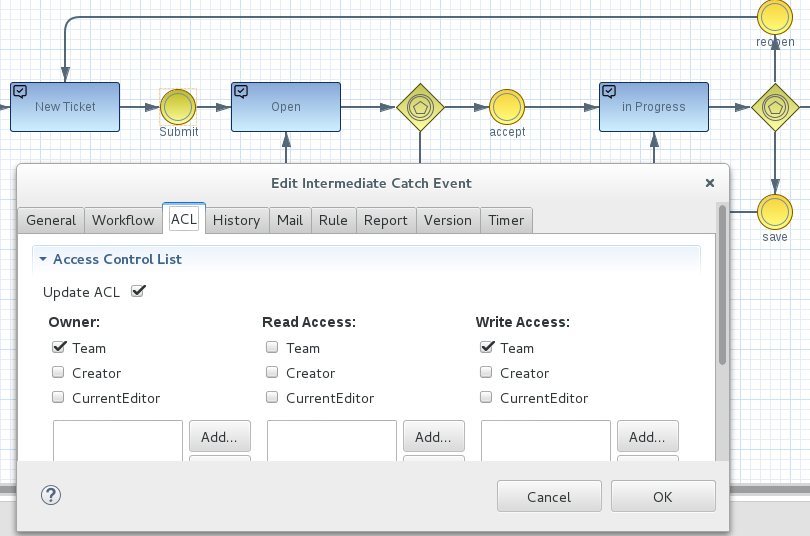
Using this access control list (ACL), it is possible to manage also complex business tasks by managing the visibility of a process instance within an organisation. The ACL of a running process instance maps to the role- and user management provided by the Java EE Application server. The Imixs-Microservice provides a integrated user service which can be used to add new users or changing there access level within the workflow engine.
Conclusion
Running Imixs-Workflow as a black box workflow server is an exciting approach which can bring a new point of view to a modern microservice architecture. Providing a Docker file the Imixs-Microservice can be deployed and started easily, thus the configuration of a own server environment is no longer necessary. This is also a good starting point to develop a Docker container for productive environments.
Read more about the Imixs-Microservice on the project documentation.
 Imixs-Microservice provides a docker image. This makes is easy to run Imixs-Microservice in a Docker container and provides a powerful way to integrate a full featured workflow engine into a microservice architecture. The Docker image can be used as a template for custom projects and provides a scaffold to start with a microservice achitecture.