
For most self managed Kubernetes environments the SQL database is one of the most important infrastructure parts. Typically SQL database servers are not designed to run on distributed nodes in an environment like Kubernetes. One solution is to run a single SQL database in a Kubernetes POD with a distributed filesystem like Longhorn or Ceph. This works well for example with PostgreSQL in most situations. Of course this can have some performance impacts and requires fast SSDs. Another solution is to run a distributed SQL Database like Cockroach. With the latest version of the Imixs-Cloud project we now offer a smart solution to run a SQL Database cluster within a self managed Kubernetes cluster.
Note: CockroachDB does not support the isolation level of transactions required for complex business logic. For that reason the Imixs-Workflow project does NOT recommend the usage of CockroachDB. See also the discussion here.
CockroachDB
CockroachDB is a distributed SQL database with a build in replication mechanism. This means that the data is replicated over several nodes in a database cluster. This increases the scalability and resilience in the case that a single node fails. With its Automated-Repair feature the database also detects data inconsistency and automatically fixes faulty data on disks. The project is Open Source and hosted on Github.
CockroachDB supports a lower level of ACID transactions. This means guaranteed atomicity, isolation, consistency, and durability of data is not the same quality as in a PostgreSQL database . However CockroachDB can be used in combination with Jakarta EE and JPA. Supporting the PostgreSQL wire protocol, CockroachDB can be used with the standard PostgresSQL JDBC driver.
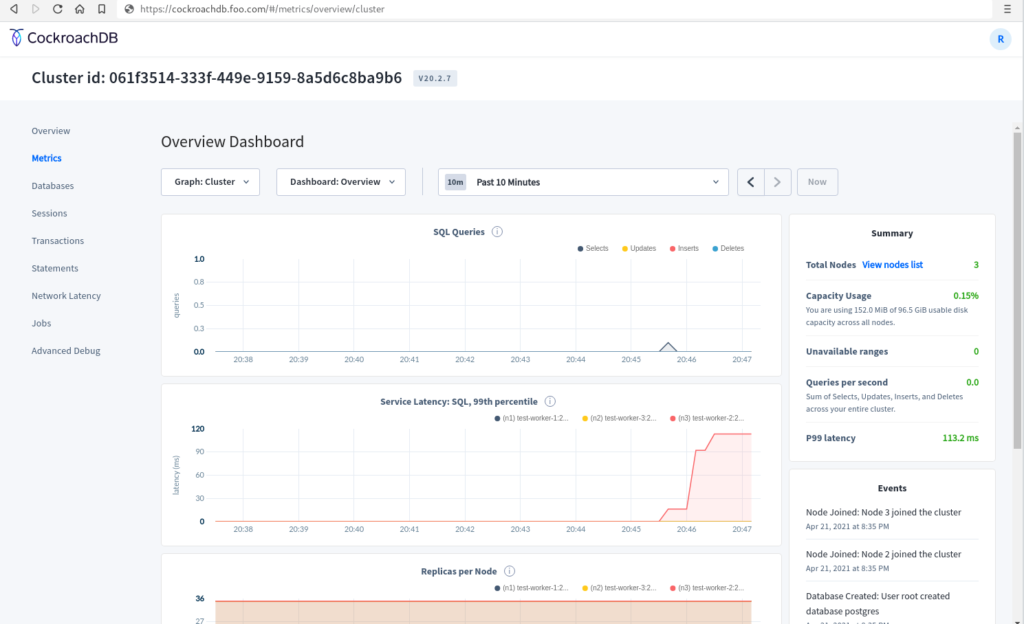
See how CockroachDB can be used within the Imixs-Cloud project .
You can find a install guide here.
 With the next minor release 4.3. of